

DIY Brake Maintenance: How to Check and Replace Your Brake Pads
Posted at Mon, Jan 26, 2026 7:00 AM
By Beach Automotive Group
Your vehicle's brakes are one of the most critical safety systems—and keeping them in peak condition is essential. While professional brake service is always a great option, many drivers are surprised to learn that checking and replacing brake pads is a job they can tackle at home with the right tools and a little confidence.
At Beach Automotive Group, we’re here to empower you with the knowledge you need to take better care of your vehicle—whether you’re a seasoned DIYer or just starting out.
Why Brake Pads Matter
Brake pads apply pressure and friction to your rotors, helping to slow down and stop your vehicle. Over time, they wear down and need replacing. If ignored, worn brake pads can lead to:
- Increased stopping distance
- Damage to rotors (a more expensive repair)
- Squealing or grinding noises
- Reduced safety and performance
Signs It’s Time to Replace Your Brake Pads
Keep an eye (and ear) out for these common signs:
- Squealing or screeching when braking
- Grinding noise (metal-on-metal contact)
- Reduced braking responsiveness
- Brake warning light on the dash
- Visible wear—pads look thin (less than 1/4 inch)
Tools You’ll Need
Before you start your brake pad replacement, gather these essentials:
- New brake pads (check your owner’s manual or ask us for help!)
- Jack and jack stands or ramps
- Lug wrench
- Socket wrench set
- C-clamp or brake caliper tool
- Gloves and safety glasses
- Brake cleaner spray
- Anti-squeal brake grease (optional)
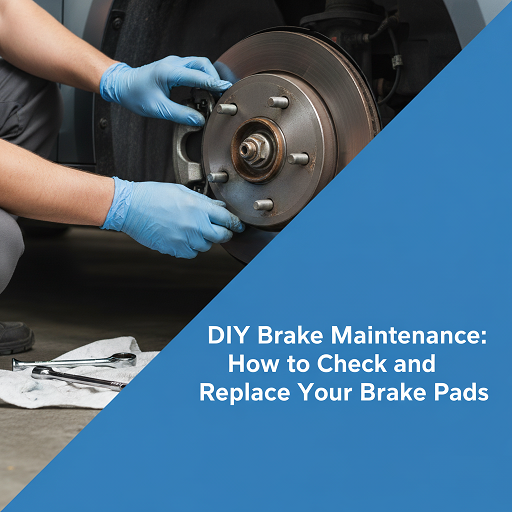
Step-by-Step: How to Check and Replace Your Brake Pads
- Park and Prep
- Park on a flat surface and engage the parking brake.
- Loosen lug nuts (don’t remove them yet).
- Use a jack to lift the vehicle and secure it with jack stands.
- Remove the Wheel
- Take off the lug nuts and remove the wheel to access the brake assembly.
- Inspect the Brake Pads
- Look at the pad thickness—anything under 1/4 inch means it’s time to replace.
- Check for uneven wear or cracks.
- Remove the Caliper
- Use a socket wrench to remove the bolts holding the caliper.
- Carefully slide it off and support it with a bungee cord or wire to avoid stress on the brake line.
- Remove and Replace the Pads
- Slide the old brake pads out of the caliper bracket.
- Apply brake grease to the back of the new pads (if desired).
- Install the new pads into the bracket.
- Compress the Caliper Piston
- Use a C-clamp or brake tool to slowly compress the caliper piston.
- This step is crucial so the caliper can fit over the new, thicker pads.
- Reinstall the Caliper
- Slide the caliper back into place and tighten the bolts.
- Reattach the Wheel and Lower the Vehicle
- Put the wheel back on, hand-tighten the lug nuts, lower the car, then tighten fully in a star pattern.
Final Touches
Before driving, pump the brake pedal a few times to seat the new pads properly. Your pedal might feel soft at first—this is normal.
 When in Doubt, We’ve Got You Covered
DIY brake maintenance can be rewarding and cost-effective, but if you’re ever unsure, our certified technicians at Beach Automotive Group are here to help. From inspections to full brake service, we’ll make sure your vehicle stays safe and road-ready.
Stop by our service center or schedule an appointment online today—and don’t forget to check our latest service specials for deals on brakes, oil changes, and more!
Beach Automotive Group
Your Trusted Automotive Partner in Myrtle Beach and Beyond